
Hands-on Kubernetes: Deploying Python Flask application with Pods, Deployments and Services
A deep dive into Kubernetes Deployments and Services. Learn how to containerise and deploy a Python Flask application onto a local Kubernetes cluster.


Introduction
In this article, we are going to dive deep into the technicalities of Kubernetes deployments, and the different deployment strategies used in the real-world right now. Also, we will be going over the fundamentals of networking and Kubernetes services. You will also get a chance to go through the process of containerising a Python Flask application and deploying it using Kubernetes Deployments and Services onto our local Kubernetes cluster deployed using Minikube.
What exactly are Pods?
Well, Pods are the smallest deployable unit in Kubernetes. Essentially, your containerised application are wrapped and managed as a Kubernetes Object.
Pods are scheduled by the Kubernetes control-plane and scheduler, it is then bound to a Kubernetes node where it will continue serving your application until it is terminated. In practice, there are 2 main ways to deploy Pods in Kubernetes:
Single container model - Each Pod will have 1 main container running a workload.
Side-car container model - This model is used when we want to extend the functionality of pods. For example, having a separate container to capture and aggregate application logs. This model is mainly used to offload non-critical workload and improve performance of primary container.
Pods are ephemeral, disposable entities in Kubernetes. So in practice, how can we configure pods to achieve high scalability, maintainability and availability? The answer is - workload management resources. In this guide, we will be going through a common management resource, also known as a Kubernetes Deployment.
Deployments - Maintain, update and rollback applications easily
One of the most commonly used workload management resources are deployments. It uses ReplicaSets underneath to ensure that the desired number of Pods are always running in the Kubernetes cluster which allows us to achieve high availability. Furthermore, it allows engineers to easily deploy new versions of our applications using different deployment strategies. Deployments also allows for quick and efficient disaster recovery by rolling back to a previous working deployment versions.

Common Deployment strategies in practice
There are many strategies used to manage deployments, the most common being,
Rolling updates - Where the new workloads are released incrementally to replace old versions. This method keeps application downtime at a minimal.
Blue-green deployment - Where you have a working application environment in Production (”Blue environment”) and you want to release a new working version that is currently deployed in Development (”Green environment”). A small subset of traffic will be diverted from blue to the green deployment, once it is stable and thoroughly tested, traffic is then fully switched.
Kubernetes Service
By now, you might be wondering how users can access our application within a Kubernetes cluster, whether it's running locally or on cloud platforms like AWS, GCP, or Azure. The key to making our application accessible is the Kubernetes Service.
Once your application is deployed, managing the networking, traffic flow, and routing between microservices—and handling inbound and outbound traffic from your Kubernetes cluster—becomes critical. Each pod gets its own IP address through the cluster’s network plugin, but managing routing for dozens or even hundreds of services can become overwhelming. Moreover, since pods are ephemeral and can be terminated or recreated at any time, maintaining stable connections can be tricky.
This is where Kubernetes Services come in. Services ensure consistent and reliable routing for traffic going to and from your pods, no matter how often the individual pods are created or destroyed. They provide a stable interface to manage traffic, making sure your application remains accessible and responsive throughout its lifecycle.
The 4 types of Kubernetes Services
Kubernetes provides 4 different types of service configurations
ClusterIP → Exposes an cluster internal IP, which only allows traffic coming from within the Kubernetes cluster.
NodePort → Creates a Service and expose it using a static port, typically from 30000-32767 (although it can be configured to be other port values).
LoadBalancer → Exposes Service using a Load Balancer, however Kubernetes does not come prepackaged with an implementation for it, to use the LoadBalancer configuration you will have to provide one or use the implementation of certain cloud providers (E.g. Create an Elastic Load Balancer on AWS)
ExternalName → Creates a Service that maps requests to a particular CNAME record. (E.g. Maps request from service to another host name).
Chaining things up with a simple tutorial
Now that we’ve covered the theory on the fundamentals of pod, deployments and services, what better way to cement our learning than to spin up our own Kubernetes cluster and deploying our own application.

In this segment, we’ll be using minikube to spin up our own Kubernetes cluster. We’ll then containerise and deploy a Python Flask application. We will then make use of Deployments and Services to run and expose our application. The full code can be downloaded from my GitHub here.
Setting up our environment
Download Docker
In order to configure and set up our Kubernetes cluster, we need to download a container runtime solution that implements the Container Runtime Interface (CRI). The most popular container runtime used for Kubernetes is the Docker Engine, which can be downloaded here.
Alternatively, there are other excellent container runtime platforms such as Podman or CRI-O which also conforms to the Kubernetes Container Runtime Interface specifications.
Setting up our Cluster using Minikube
Minikube is a lightweight yet comprehensive platform for learners to start creating local Kubernetes cluster on their machine. You can download it via curl or using Homebrew (for macOS users).
curl -LO https://storage.googleapis.com/minikube/releases/latest/minikube-darwin-arm64
sudo install minikube-darwin-arm64 /usr/local/bin/minikube

#After downloading Minikube, let's start our cluster
minikube start

#Test command to the Kubernetes API server
kubectl get pods -A
Installing Python
Download Python from https://www.python.org/downloads/ or through any package manager you prefer, for this tutorial I’m using Python 3.12.4.
Create a virtual environment
We will also create a virtual environment to isolate dependencies, have ease of deployment and avoid any dependency compability issues.
#Creates a virtualenv on current path
python3 -m venv <environment-name>

#To activate your newly create python3 virtualenv
source <environment-name>/bin/activate
Creating our Flask application and Docker Image
In this section, we will be creating our Flask App. Then, we will write our own Dockerfile to specify the steps to build our Docker Image. Then we will also need to export the requirements.txt, which will used in Dockerfile to build the Docker Image.
First, let’s install the Flask framework
#Install the Flask framework
pip3 install -U Flask
Now let’s create our application called main.py
from flask import Flask, render_template

app = Flask(__name__)

@app.route("/")
def hello_world():
    success_msg = "Your Kubernetes deployment is successful!"
    return render_template("index.html", message=success_msg)

if __name__ == "__main__":
    app.run(host='0.0.0.0', port=5001)
Now let’s output our required dependencies into a requirements text file.
pip3 freeze > requirements.txtDockerizing our Flask Application
FROM python:3.9.20-alpine
WORKDIR /app
COPY . /app/

RUN pip3 install --no-cache-dir -r requirements.txt &&\
    apk update && apk add curl

CMD ["python", "main.py"]
Building our Docker Image and pushing it into Docker Hub Registry!
Create a folder, in this case, I’ve named the file docker. Within in contains the Dockerfile, main.py for our flask web application and also the requirements.txt generated from our previous step.
#Folder structure
docker
├── Dockerfile
├── main.py
├── requirements.txt
├── static
│   └── styles.css
└── templates
    └── index.html

#Now let's build our dockerimage (give it any tag you'd like)
docker build -t <docker-hub-username>/<image_name>:<tag> ./docker/.

#To push our image, login to Docker Hub, it will prompt you for credentials
docker login
#else
docker login --username <your-username>
docker push <docker-hub-username>/<image_name>:<tag>
Deploying our Flask Application onto Kubernetes!
With our image created, we can test it by spinning up a pod on our minikube cluster using the new image. We will then do a quick curl command into the container within our Kubernetes pod to check that our web application is running as intended!
#Example of the run command to create our application
#The image name I used is k8s_deployment

kubectl run <pod-name> --image=<docker-username>/<image_name>:<tag>

#Start a pod using the Python Flask Image
kubectl run flask-app --image=<docker-username>/k8s_deployment:v3

#Let's check if our webapp is running as supposed to
kubectl exec -it webapp -- curl 127.0.0.1:5001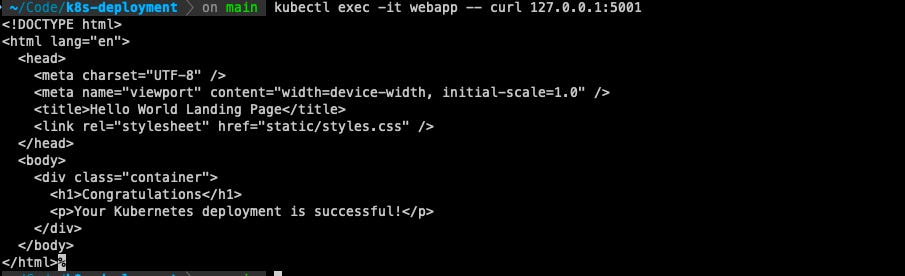
Deploying our Flask Application as a Deployment!
Now that our Pod is able to run successfully with our container image, we will write our deployment configuration and deploy it declaratively using Kubectl.
apiVersion: apps/v1
kind: Deployment
metadata:
  name: webapp
  namespace: default
spec:
  replicas: 3
  selector:
    matchLabels:
      app: webapp
  template:
    metadata:
      labels:
        app: webapp
    spec:
      containers:
        - name: webapp
          #replace with your own registry username ,image and tag
          image: wilburlua910/k8s_deployment:v3
          imagePullPolicy: Always
          ports:
            - containerPort: 5001
          resources:
            requests:
              memory: "64Mi"
              cpu: "250m"
            limits:
              memory: "128Mi"
              cpu: "500m"
kubectl apply -f deployment.yaml
#Sample response
#deployment.apps/webapp created
#Let's view our deployment in detail
kubectl describe deployment webapp
Exposing our Deployment with Kubernetes Services!
We are using the NodePort service to expose our web application.
apiVersion: v1
kind: Service
metadata:
  name: flask-service
  namespace: default
spec:
  type: NodePort
  selector:
    app: webapp
  ports:
    - port: 80
      targetPort: 5001
#Deploying our service
kubectl apply -f service.yaml
#Describe our newly created service
kubectl describe svc flask-service
As you can see from our output, the Service is helping us manage traffic between our 3 pods! (See our 3 pods under Endpoints!)
Accessing our web application from our local browser!
For minikube service, as it is running from a Virtual Machine, we need to port forward from Minikube’s internal network to our local machine’s network
minikube service <your-service-name> --url

Conclusion
We’ve learned the theory behind Kubernetes Pods and how Kubernetes Deployments handle these ephemeral resources and allow us to scale and manage these pods. We also went through the types of Kubernetes Service and how it can be used to expose our applications to end user.
Finally, in our hands-on tutorial, we’ve manage to build our own containerised Python web application and deploy it on a Kubernetes cluster. It allows us to understand the complete end-to-end flow from software development to deployment.